Usage Dashboard
The Usage Dashboard gives you an at‑a‑glance view of how Communication Hub is being used across your organization. Designed for Service Providers, it surfaces key usage metrics and trends so you can quickly understand user activity, track adoption, and monitor consumption against your subscription.
With the Usage Dashboard, you can confidently assess where you stand at any point in time—identify high and low usage patterns, spot opportunities for optimization, and ensure you are getting maximum value from Communication Hub, all without digging through detailed reports. You can also monitor your message usage, so that you can determine if your tier is appropriate and anticipate any additional charges.
Free Tier
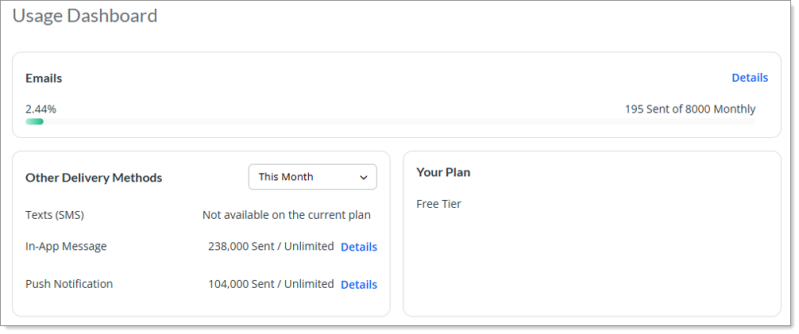
As a Service Provider, if you are on a Free Tier, you will be presented with the following details in a widget view:
The Emails widget displays the usage and status of your sent email campaigns. It includes a progress bar that shows the percentage used, which is calculated from the first of the current month based on the email limit set for the user. If you are on a Free Tier, you will be allowed to send up to 8,000 emails per month. However, if you upgrade your plan to include Text (SMS), then the Email count upgrades to unlimited.
The widget also displays the actual message count of emails sent out of the total limit assigned to you.
You can view detailed information about sent campaigns for the delivery method by clicking the Details button. The system displays with the Email Usage Details modal window. The information displayed on this window allows you to better understand how your message allotment is being used and by whom.
The Email Usage Details modal window shows the following details:
-
Campaign Name - Name of the title of the campaign.
-
Sender - Name of the person who sent the email campaign.
-
Date Sent - Date on which the campaign was sent.
-
Sent Count - Total number of successful sent messages.
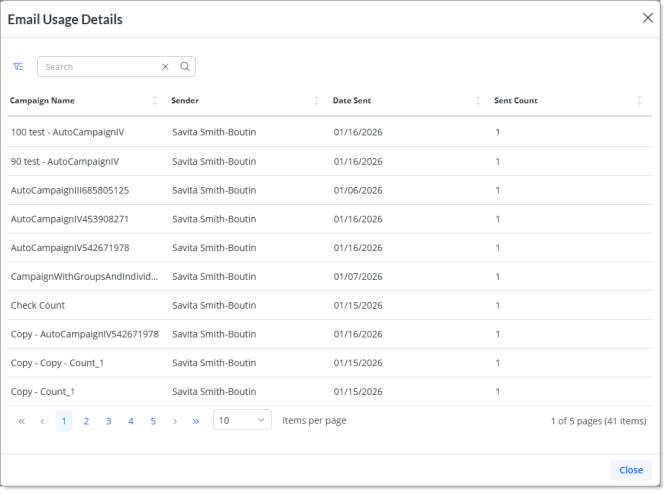
On this modal window, you can search, filter, and sort the data. Enter one or more keywords in the Search field to display a list of items that contain the keyword(s).
You can filter the data by date range (Date Sent) and by Sender. Simply click the Toggle Filters button ![]() and complete the following information as necessary to filter the list of items that display in the grid accordingly:
and complete the following information as necessary to filter the list of items that display in the grid accordingly:
-
Select a date range from the Start Date and the End Date date picker.
-
Select a sender from the Sender drop-down. You can select multiple senders at once.
-
(Optional) To reset and clear the filter criteria, click the
 icon on each of the fields.
(Optional) Sort data that displays in a list by completing the following:
-
Click a column header once to sort data in a list in ascending order by the value in that column.
-
Click the a column header a second time to sort data in a list in descending order by the value in that column.
-
Click the column header a third time to remove the sort option for that column.
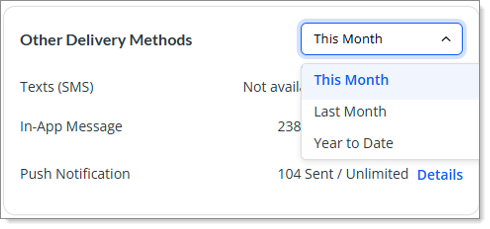
The Other Delivery Method widget lists the delivery methods that are unlimited or excluded from the plan, along with the successful message count for each delivery method.
On a free tier plan with no additional booster package purchase, the Text (SMS) row displays a message stating, Not available on the current plan.
The In-App Message row displays the count of total in-app campaigns sent.
You can view detailed information about sent campaigns for the In-App campaign delivery method by clicking the Details button. The system displays with the In-App Message Usage Details modal window. The information displayed on this window allows you to better understand how your message allotment is being used and by whom.
The In-App Message Usage Details modal window shows the following details:
-
Campaign Name - Name of the title of the campaign.
-
Sender - Name of the person who sent the email campaign.
-
Date Sent - Date on which the campaign was sent.
-
Sent Count - Total number of successful sent messages.
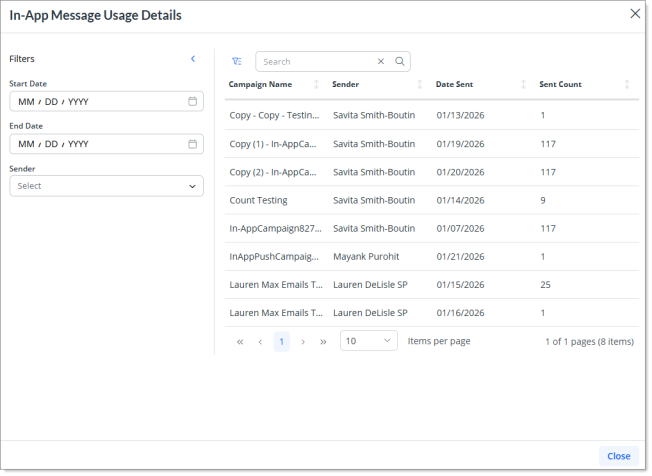
On this modal window, you can search, filter, and sort the data. Enter one or more keywords in the Search field to display a list of items that contain the keyword(s).
You can filter the data by date range (Date Sent) and by Sender. Simply click the Toggle Filters button ![]() and complete the following information as necessary to filter the list of items that display in the grid accordingly:
and complete the following information as necessary to filter the list of items that display in the grid accordingly:
-
Select a date range from the Start Date and the End Date date picker.
-
Select a sender from the Sender drop-down. You can select multiple senders at once.
-
(Optional) To reset and clear the filter criteria, click the
icon on each of the fields.
(Optional) Sort data that displays in a list by completing the following:
-
Click a column header once to sort data in a list in ascending order by the value in that column.
-
Click the a column header a second time to sort data in a list in descending order by the value in that column.
-
Click the column header a third time to remove the sort option for that column.
The Push Notification row displays the count of total campaigns sent via push notification delivery method.
You can view detailed information about sent campaigns for the Push Notification campaign delivery method by clicking the Details button. The system displays with the Push Notification Usage Details modal window. The information displayed on this window allows you to better understand how your message allotment is being used and by whom.
The Push Notification Usage Details modal window shows the following details:
-
Campaign Name - Name of the title of the campaign.
-
Sender - Name of the person who sent the email campaign.
-
Date Sent - Date on which the campaign was sent.
-
Sent Count - Total number of successful sent messages.
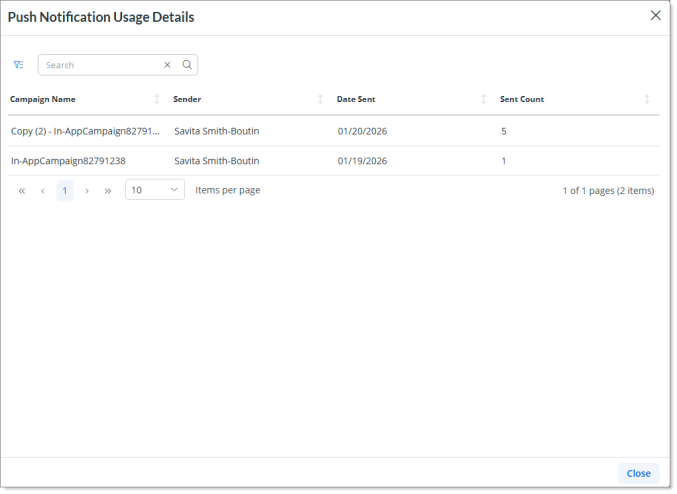
On this modal window, you can search, filter, and sort the data. Enter one or more keywords in the Search field to display a list of items that contain the keyword(s).
You can filter the data by date range (Date Sent) and by Sender. Simply click the Toggle Filters button ![]() and complete the following information as necessary to filter the list of items that display in the grid accordingly:
and complete the following information as necessary to filter the list of items that display in the grid accordingly:
-
Select a date range from the Start Date and the End Date date picker.
-
Select a sender from the Sender drop-down. You can select multiple senders at once.
-
(Optional) To reset and clear the filter criteria, click the
icon on each of the fields.
(Optional) Sort data that displays in a list by completing the following:
-
Click a column header once to sort data in a list in ascending order by the value in that column.
-
Click the a column header a second time to sort data in a list in descending order by the value in that column.
-
Click the column header a third time to remove the sort option for that column.
In addition, this widget also includes a drop-down with preset filters for user to view updated message counts based on a time period.
The filter options include:
-
This Month - This is the default filter. This filter option calculates the total count of sent campaigns against each delivery method based on the start of the current month.
-
Last Month - This filter displays the total campaigns that you sent the previous month.
-
Year to Date - This filter calculates the count of sent campaigns from the first day of the current calendar year up to the present date.
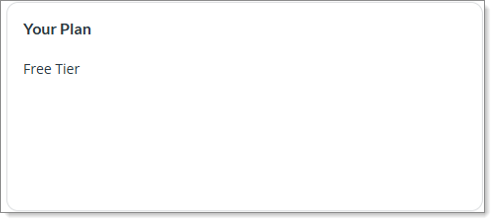
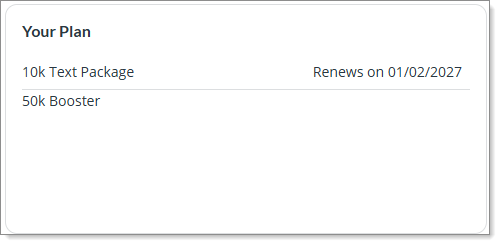
The Your Plan widget displays the Tier in which the PEO is enrolled in. If a PEO purchases for additional text packages (called Booster Packs), it will also display the booster pack enrollment and the renewal date.
Paid Tier
As a Service Provider, if you are on a Paid Tier, you will be presented with the following details in a widget view:
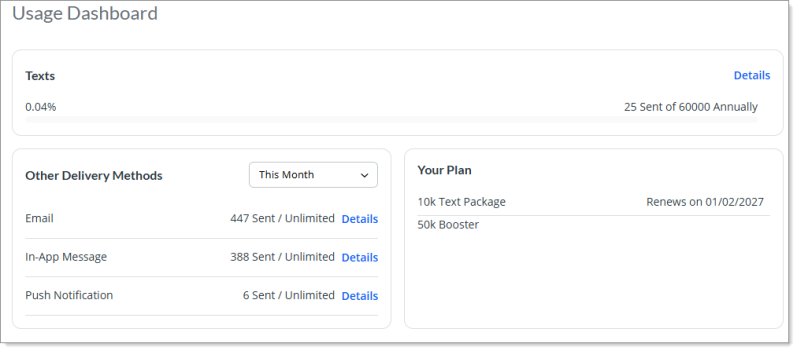
For a Paid Tier PEO, the Usage Dashboard displays the Texts widget on top. This widget displays the usage and status of your sent text (sms) campaigns. It includes a progress bar that shows the percentage used, which is calculated from the first of the current month based on the text package purchased by the user.
The widget also displays the actual message count of text sent out of the total limit assigned to you.
You can also view detailed information about sent campaigns for the delivery method by clicking the Details button. The system displays with the Texts Usage Details modal window. The information displayed on this window allows you to better understand how your message allotment is being used and by whom.
The Texts Usage Details modal window shows the following details:
-
Campaign Name - Name of the title of the campaign.
-
Sender - Name of the person who sent the text campaign.
-
Date Sent - Date on which the campaign was sent.
-
Sent Count - Total number of successful sent messages.
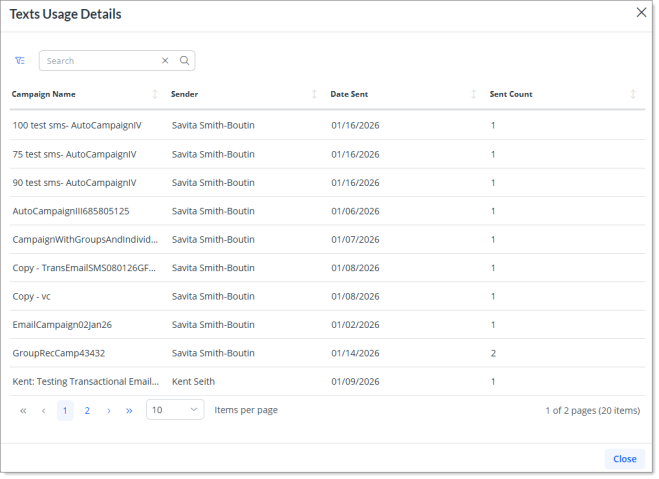
On this modal window, you can search, filter, and sort the data. Enter one or more keywords in the Search field to display a list of items that contain the keyword(s).
You can filter the data by date range (Date Sent) and by Sender. Simply click the Toggle Filters button ![]() and complete the following information as necessary to filter the list of items that display in the grid accordingly:
and complete the following information as necessary to filter the list of items that display in the grid accordingly:
-
Select a date range from the Start Date and the End Date date picker.
-
Select a sender from the Sender drop-down. You can select multiple senders at once.
-
(Optional) To reset and clear the filter criteria, click the
icon on each of the fields.
(Optional) Sort data that displays in a list by completing the following:
-
Click a column header once to sort data in a list in ascending order by the value in that column.
-
Click the a column header a second time to sort data in a list in descending order by the value in that column.
-
Click the column header a third time to remove the sort option for that column.
The Other Delivery Method widget lists the delivery methods that are unlimited or excluded from the plan, along with the successful message count for each delivery method. Since this is for a paid tier and the user has purchased the Text (SMS) plan, so it will automatically include unlimited Email delivery method.
The Email row displays the count of total email campaigns sent.
You can view detailed information about sent campaigns for the delivery method by clicking the Details button. The system displays with the Email Usage Details modal window. The information displayed on this window allows you to better understand how your message allotment is being used and by whom.
The Email Usage Details modal window shows the following details:
-
Campaign Name - Name of the title of the campaign.
-
Sender - Name of the person who sent the email campaign.
-
Date Sent - Date on which the campaign was sent.
-
Sent Count - Total number of successful sent messages.
On this modal window, you can search, filter, and sort the data. Enter one or more keywords in the Search field to display a list of items that contain the keyword(s).
You can filter the data by date range (Date Sent) and by Sender. Simply click the Toggle Filters button ![]() and complete the following information as necessary to filter the list of items that display in the grid accordingly:
and complete the following information as necessary to filter the list of items that display in the grid accordingly:
-
Select a date range from the Start Date and the End Date date picker.
-
Select a sender from the Sender drop-down. You can select multiple senders at once.
-
(Optional) To reset and clear the filter criteria, click the
icon on each of the fields.
(Optional) Sort data that displays in a list by completing the following:
-
Click a column header once to sort data in a list in ascending order by the value in that column.
-
Click the a column header a second time to sort data in a list in descending order by the value in that column.
-
Click the column header a third time to remove the sort option for that column.
The In-App Message row displays the count of total in-app campaigns sent.
You can view detailed information about sent campaigns for the In-App campaign delivery method by clicking the Details button. The system displays with the In-App Message Usage Details modal window. The information displayed on this window allows you to better understand how your message allotment is being used and by whom.
The In-App Message Usage Details modal window shows the following details:
-
Campaign Name - Name of the title of the campaign.
-
Sender - Name of the person who sent the email campaign.
-
Date Sent - Date on which the campaign was sent.
-
Sent Count - Total number of successful sent messages.
On this modal window, you can search, filter, and sort the data. Enter one or more keywords in the Search field to display a list of items that contain the keyword(s).
You can filter the data by date range (Date Sent) and by Sender. Simply click the Toggle Filters button ![]() and complete the following information as necessary to filter the list of items that display in the grid accordingly:
and complete the following information as necessary to filter the list of items that display in the grid accordingly:
-
Select a date range from the Start Date and the End Date date picker.
-
Select a sender from the Sender drop-down. You can select multiple senders at once.
-
(Optional) To reset and clear the filter criteria, click the
icon on each of the fields.
(Optional) Sort data that displays in a list by completing the following:
-
Click a column header once to sort data in a list in ascending order by the value in that column.
-
Click the a column header a second time to sort data in a list in descending order by the value in that column.
-
Click the column header a third time to remove the sort option for that column.
The Push Notification row displays the count of total campaigns sent via push notification delivery method.
You can view detailed information about sent campaigns for the Push Notification campaign delivery method by clicking the Details button. The system displays with the Push Notification Usage Details modal window. The information displayed on this window allows you to better understand how your message allotment is being used and by whom.
The Push Notification Usage Details modal window shows the following details:
-
Campaign Name - Name of the title of the campaign.
-
Sender - Name of the person who sent the email campaign.
-
Date Sent - Date on which the campaign was sent.
-
Sent Count - Total number of successful sent messages.
On this modal window, you can search, filter, and sort the data. Enter one or more keywords in the Search field to display a list of items that contain the keyword(s).
You can filter the data by date range (Date Sent) and by Sender. Simply click the Toggle Filters button ![]() and complete the following information as necessary to filter the list of items that display in the grid accordingly:
and complete the following information as necessary to filter the list of items that display in the grid accordingly:
-
Select a date range from the Start Date and the End Date date picker.
-
Select a sender from the Sender drop-down. You can select multiple senders at once.
-
(Optional) To reset and clear the filter criteria, click the
icon on each of the fields.
(Optional) Sort data that displays in a list by completing the following:
-
Click a column header once to sort data in a list in ascending order by the value in that column.
-
Click the a column header a second time to sort data in a list in descending order by the value in that column.
-
Click the column header a third time to remove the sort option for that column.
In addition, this widget also includes a drop-down with preset filters for user to view updated message counts based on a time period.
The filter options include:
-
This Month - This is the default filter. This filter option calculates the total count of sent campaigns against each delivery method based on the start of the current month.
-
Last Month - This filter displays the total campaigns that you sent the previous month.
-
Year to Date - This filter calculates the count of sent campaigns from the first day of the current calendar year up to the present date.

The Your Plan widget displays the Tier in which the PEO is enrolled in. It shows the additional text packages (called Booster Packs) along with the booster pack renewal date.
Managing Email and Text Sending Limits for SMBs
With the feature of worksite managers and trusted advisors having access to Communication Hub, the Usage Dashboard has the ability to manage email and text sending limits for individual SMBs directly from this screen so that SMBs cannot consume a disproportionate email or SMS volume and cause overage charges.
As a service provider, you can monitor message usage for each SMB that you have provided access to so that you can track how SMBs are using Communication Hub. This will provide you with the ability to prevent SMBs from using too many messages.
Note: Service Providers can only view the section of managing email and text sending limits on the Usage Dashboard if they are on a paid tier. The ability to allow SMBs have access to Communication Hub is not available if you are on a free tier.
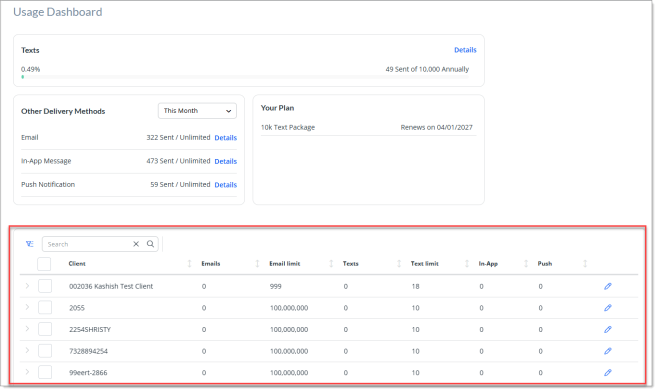
You can expand the SMB records and view campaign usage data for each SMB. This allows you to analyze how your clients are using Communication Hub. When you expand the SMB record, the most recent campaign sent by that SMB is displayed at the top.
From this screen, you can:
Complete the following:
-
On the Usage Dasboard screen, enter one or more keywords in the search field to display a list of items that contain the keyword(s).
-
You can search by the Client column field. Type two or more characters to filter the list.
-
Click the Toggle Filters button
 and complete the following information as necessary to filter the list of items that display in the grid:
-
Select one or more option from the Usage status drop-down
-
Select one or more service type in the Service type drop-down
-
Select one or more email limit options from the Email limit drop-down
-
Select one or more text limit options from the Text limit drop-down
-
-
(Optional) To reset and clear the filter criteria, click the
icon on each of the fields. -
(Optional) Sort data that displays in a list by completing the following:
-
Click a column header once to sort data in a list in ascending order by the value in that column.
-
Click the a column header a second time to sort data in a list in descending order by the value in that column.
-
Click the column header a third time to remove the sort option for that column.
-
Complete the following:
-
On the Usage Dasboard screen, either select the checkbox for a client record or click the
 pencil icon.
The system displays the Limits: <SMB name> dialog box.
-
Here, set the monthly Email limit in the Email limit (Monthly) field. To provide unlimited email limit access, simply turn on the Unlimited toggle button.
-
Now, set the text limit in the Text limit (Annual) field. This will provide access to text on an annual basis. After you have set the limit count, you can view the remaining messages that is available. For example, if the total PEO package count is 10,000 and you allot 300 to an SMB, then the remaining count will be displayed as 9,700 left out of 10,000 total. To provide unlimited text limit access, simply turn on the Unlimited toggle button.
-
Once you have set the limit, click Save. The system displays a success message stating, "Organization usage limit updated successfully."
-
To edit email and text limits for multiple SMBs, simply select the checkbox for the desired SMBs and from this
 icon that is displayed, select Edit email limits or Edit text limits to set limit on emails and texts respectively.
Note: Please note the following:
-
The limits are set to 0 by default.
-
When allocating limits to SMBs, if you try to allocate with limit that is greater than your current plan's limit, the system displays a warning message. When any of your SMBs reaches to greater than or equal to 75% of the allotted limits, then a visual warning indicator is displayed.
-
If you provide a certain limit to SMB and they have scheduled campaigns, and then you try to lower the allocated limit for that SMB, then a warning banner with a title May Interrupt Scheduled Campaigns is displayed with a message stating "This will lower their limit too much to send campaigns they have scheduled."
Usage Dashboard for SMBs
When a Service Provider is on a paid tier and has purchased the additional SMB access add‑on, their SMB clients can access their own Usage Dashboard to view and easily monitor email and text usage limits within their plan details. The layout displayed is similar to that of the main Usage Dashboard that Service Providers have access to. The only difference is the count of different delivery methods available for SMBs.

Also, please note the following:
-
The Email and Text delivery methods are displayed with a progress bar along with percentage calculated based on total sent with respect to total allotted limits. Additionally, you can click Details to view detailed usage reporting.
-
If a Service Provider allocates a plan that includes no limit to their SMBs, the Usage Dashboard does not calculate the usage percentage.
-
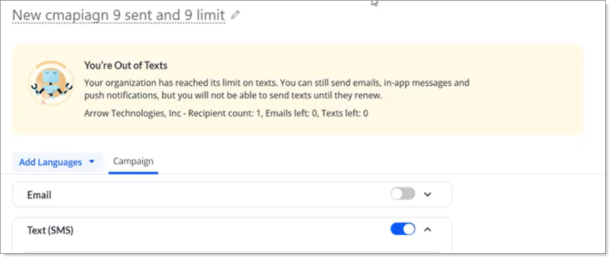
When you as an SMB manager or trusted advisor exhaust your allocated email or text message limit for your company, then a banner message is displayed which indicates that you can no longer send email or text messages. For example: