Communication Hub File Import
Communication Hub is a powerful platform for delivering targeted communications to employees. While users can manually select individual employees for a campaign, the true strength of the system lies in its ability to leverage groups for scalable & precise outreach. Currently, Communication Hub supports three types of groups, with a fourth option coming soon:
| • | PrismHR Segments: PrismHR clients already use Segments to send employee alerts and personalize the Employee Portal experience (e.g., widgets and menus). These dynamic segments are now available in Communication Hub, enabling targeted messaging based on existing segment logic. |
| • | Ad-hoc Groups: Employee data is synced with Communication Hub. Hence, users can filter employees by attributes such as company, resident state, department, division, and more. These filtered lists can be saved as reusable groups for future campaigns. |
| • | File Import: Users can create groups by importing a CSV file containing employee records. While the source of the file can vary, all employees in the file must already exist in Communication Hub. The most powerful use case involves leveraging Report Center and Snowflake to run advanced queries on PrismHR employee data—then exporting the results and importing them into Communication Hub. |
| • | Examples of powerful queries include: |
“Find all active, exempt employees in Massachusetts hired after January 1, 2024”
“Find all employees enrolled in benefit plan ABC”
| • | Report Center Integration (Coming Soon!): We are working on integration with Report Center that will allow service providers to create and share employee queries/reports directly with Communication Hub, thus eliminating the need to manually export and import employee lists. This enhancement will bring the full power of Report Center and Snowflake directly into the Communication Hub workflow. |
This article describes how to import client groups by uploading a formatted CSV file from Report Center.
CSV File Requirements
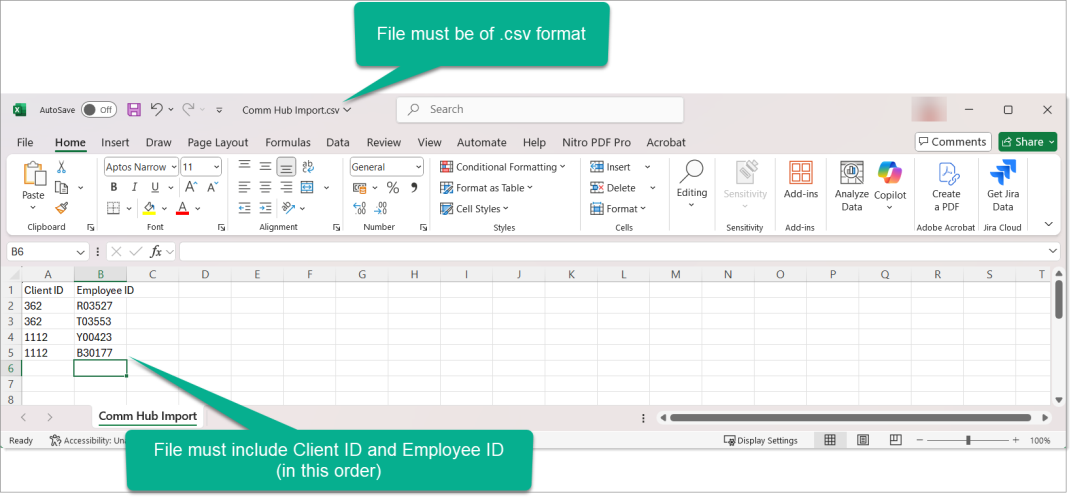
To import recipients into Communication Hub using a .csv file, the document must follow a very specific format. Since the import process matches recipients to existing records in Communication Hub (your are not actually importing the employees – just matching them), only minimal data is required—specifically:
| • | Client ID (required) |
| • | Employee ID (required) |
Please note that these two must be labeled correctly, and appear in the correct order.
Required Format
Please ensure:
| • | The file is saved as a .csv (Comma-Separated Values) document. These documents are easily edited in the Microsoft Excel application. |
| • | The file contains the following two columns: |
| • | Client ID |
| • | Employee ID |
| • | The names of the columns are spelled exactly as shown above (case-insensitive). |
| • | The columns must appear in that specific order- Client ID first, followed by the Employee ID. |
Below is a screenshot from a sample CSV file, which you can also download HERE and use as a template.
Please note the following:
| • | There are no naming restrictions for the .csv file. |
| • | You can include additional columns, but they will be ignored during import. These extra fields can be useful for internal verification or data manipulation prior to upload. |
Creating a Group by Importing a CSV File Import
To create a group by importing a CSV File:
-
Click
 (Back Office).
 -
From System | Action, click Communication Hub to access the campaign dashboard.
-
From the campaign dashboard, click the Manage Groups quicklink. The Groups form displays.
-
Click New and from the drop-down list that is displayed, click the Import File button. The Import Group pop-up displays.
-
Here, enter a Group Name. Please ensure that the group name is an easily identifiable name as this is what you will see on the Groups screen.
-
Enter a description for the Group Name.
-
Upload the CSV file from your system by clicking the Click to upload button or drag and drop your CSV file from your system to the CSV Upload box.
-
The import begins processing, and there are two level of validation:
-
Quick Validation- The system checks for the correct column header names and if it matches, then a success message stating, CSV headers match expected format. displays.
-
Detailed Validation- If you upload a file that mismatches the order of the column headers or does not contain any one of the required columns, an error message is displayed which shows the user the exact error cause and asks them to fix the errors.
To fix these errors, you will need to make changes to the .csv file and redo the import.
-
-
After successful file validating, the recipients will be imported, and the new group is created on the Groups screen.
-
Click the hyperlink on the Group Name column record to view the details of recipients that you have imported. Alternatively, click the three dots on the group record and click View Recipients to view the details of the imported recipients.
